Needlepunch Information
and Tips
Cranberry Junction Designs
PO Box 68
Rexburg, Idaho 83440
(208) 356-6812 tel./fax
cranjd@cranberryjunction.com
|
Needlepunch Information and Tips
|
Cranberry Junction Designs
(208) 356-6812 tel./fax |
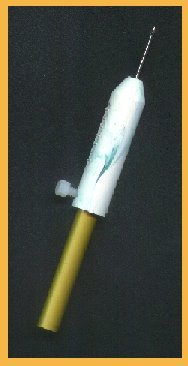
| 1. When threading your needlepunch, don't forget
it's a two-step process. The floss will initially be threaded through
the hollow needle itself, and the second step is to thread the floss through
the eye of the needle. Leave about a ½" to 1" tail extending from the
eye of the needle before starting.
Remember to insert your needle threader through the top of your needlepunch and out through the gold handle area. Then place your floss in the threader and pull the thread back through the pointed tip of your hollow needlepunch. 2. Ensure that while you are needlepunching, the flow of your floss is loose and not constrained by anything like your elbow, materials, etc. If you've never needlepunched before, practice first on a piece of scrap fabric before starting your project, so you'll get a feel on the punching technique. 3. Keep your fabric taut and tight while punching. Tighten the embroidery hoop securely to your fabric. Punch in smaller areas first. 4. When needlepunching, insert your needle all the way through the fabric, then bring it up slowly ensuring not to lift the needle point off the fabric. Slide the needle tip over to your next insertion point and punch through. Keep your needlepunching stitches close and even. When you are through with a section, simply hold the base of the stitched area down, and clip the thread off. 5. Keep in mind that you are needlepunching the backside of your design. The loops are being created on the opposite side. So you may want to check under your hoop to see how your work is coming along. If there is a loop or a snag that is sticking out, just use a sharp pair of scissors and clip them even to blend in with your other loops. (The back side is nice too! We've used the backside to display our designs too. Just ensure that the ends are clipped even. It looks like a primitive type stitchery, if you'd like, spray it with some rit tan dye to give it a rustic look, dry, then frame it.) 6. You may use a tiny dab of glue at the end of each punching section to secure thread to base fabric. 7. Experiment with various fabrics - Remember they need to be tightly woven and sturdy enough to take the needlepunch through. Do not use muslin or osnaburg type fabrics. They are too thin and will tear. Weaver's cloth, light weight duck cloth, heavier type flannels and wools are ideal for these type of projects. Also, try upholstery type fabrics without the rubber content backing works great too. 8. Experiment using various needle lengths. Adjust your needlepunch gauge and create an area that has longer loops to create some wonderful contrast in your design projects. Ensure that when you screw on the fastener to secure your gauge, do not over tighten the screw or it will crack your gauge from the pressure. 9. Variations for your needlepunch motif: After completing a needlepunched motif, cut around your design leaving a 1/4" space allowance. Clip around edges and applique needlepunched "patch" to selected fabrics.
|
Back to Primitive Stitcheries Back to New Designs
| Home | Artistic
Calligraphy Services| Hang Tags for Crafting
| Patterns, Kits & Stitcheries|
| New
Designs || Wholesale Information |
E-mail us |